Guide to Managing Associations for Custom Objects
Guide to Managing Associations for Custom Objects
Associations in custom objects allow you to link different records together in a structured and meaningful way. Whether you need to associate a contact with a custom object or link two custom objects, this feature enables you to track relationships across various data points. This article will walk you through the process of creating, managing, and editing these associations.
Creating Associations
Section titled “Creating Associations”Associations allow you to establish a connection between custom objects and contacts or between two custom objects. To create associations, follow these steps:
Steps to Create Associations:
Section titled “Steps to Create Associations:”1- Access the Custom Objects Section:
- Navigate to Account > Settings > Objects.
- Select the custom object you wish to create an association for.
2- Click on the Associations Tab:
- In the custom object, go to the Associations tab.
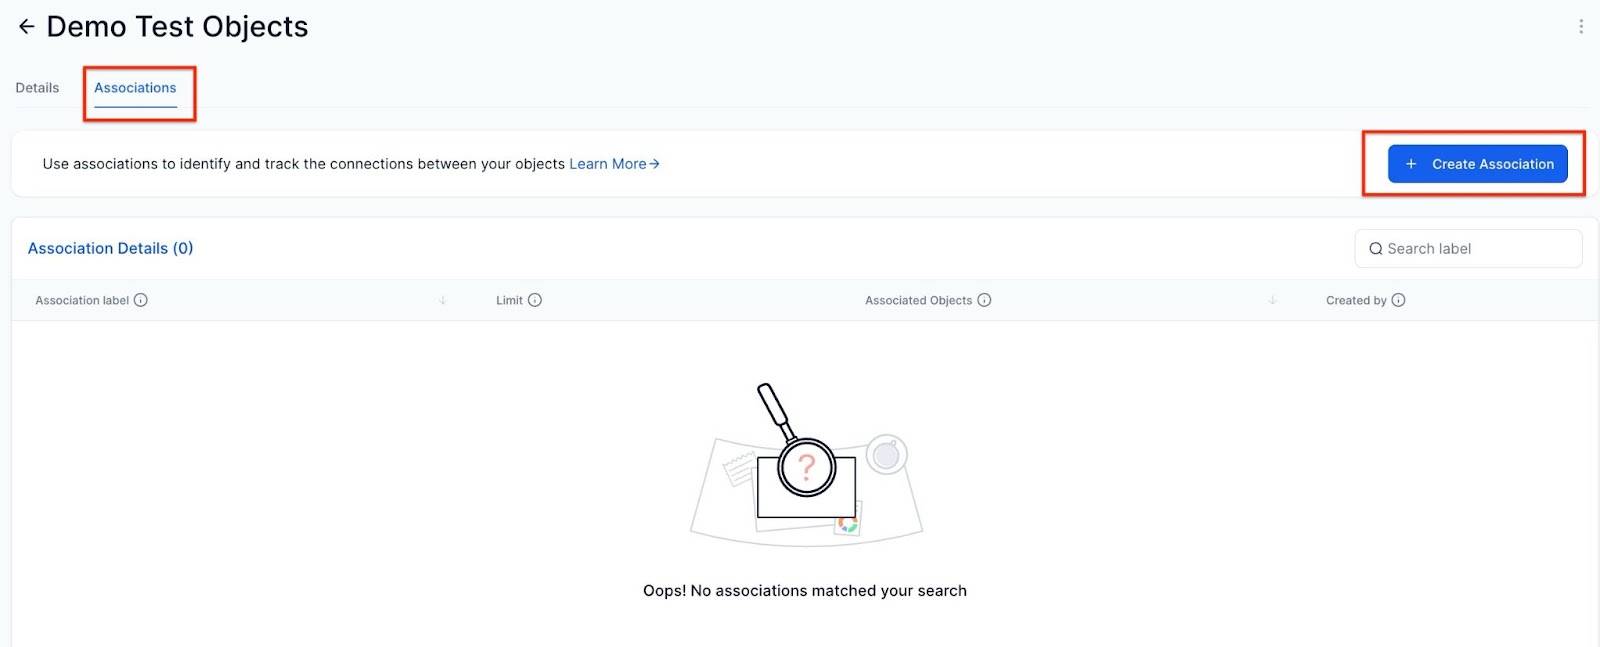
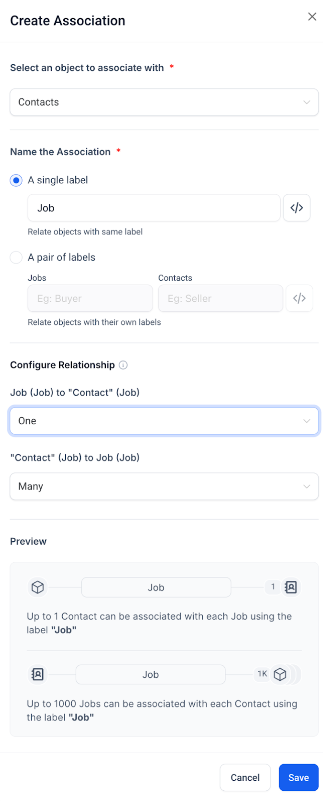
3- Set Up Labels:
- You can create a single label or a pair of labels to define the relationship.
- Example: If you are associating a car with its owner, you can set the labels as “Owner” and “Car”.
- You can also set limits on the number of relationships between objects in your Custom Objects setup.
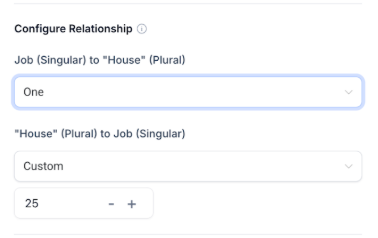
Association Limits:
For multi-label associations:
- One-to-One (1:1)
- One-to-N (where N ≤ 1000)
- One-to-Many
- Many-to-Many
For contact-to-contact (single label):
- One-to-One
- Many-to-Many
- Custom N-to-N
Note: All associations are many-to-many, meaning multiple records can be linked in a relationship.
- You can use these labels to associate records in your custom objects or between a custom object and a contact.
Limitations:
Section titled “Limitations:”- You can create up to 10 association labels between two contacts or a contact and a custom object combination.
4- Save and Apply:
- Once you have set up the labels, click Save.
Managing Associations
Section titled “Managing Associations”After creating associations, you can view, edit, or remove them as needed. Here’s how to manage your associations:
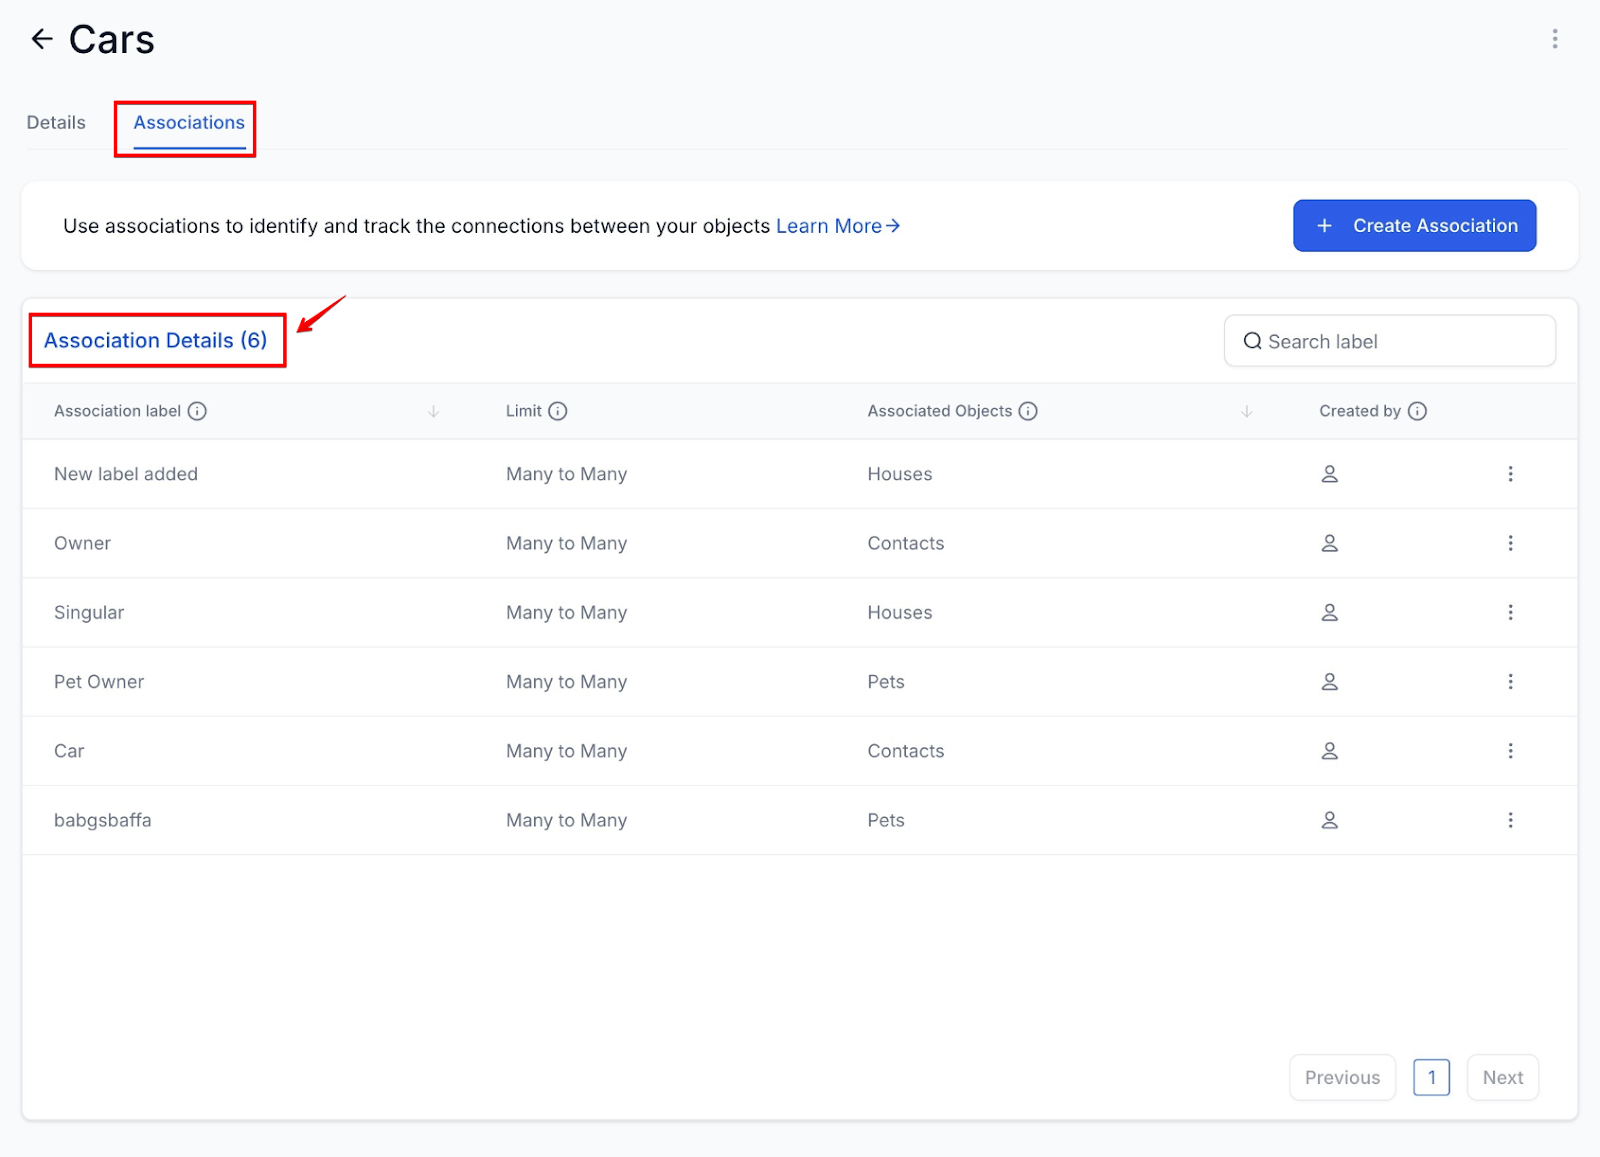
View Associations:
Section titled “View Associations:”1- Access Record Details:
- Go to the record details of the custom object.
- On the right side panel, find the Related Objects section, where all associations will be listed.
Editing Associations:
Section titled “Editing Associations:”1- Edit the Association:
- If needed, you can update an association by selecting the association label, clicking the kebab menu (three dots icon), and choosing Edit.
- You can change the label name, but cannot edit the internal name.

Removing Associations:
Section titled “Removing Associations:”1- Delete an Association:
- Select the association label and click on the kebab menu.
- Choose Delete from the dropdown.
- Type “DELETE” in the text box and click Delete to confirm.
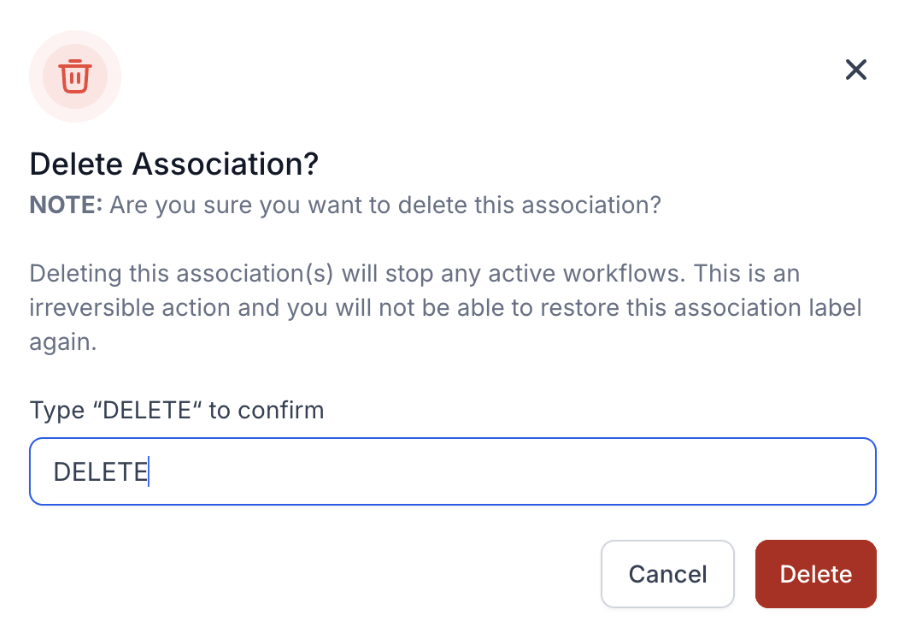
Note: Deleting an association is only possible if there are no existing relationships between two different records using the mentioned label.
Associating Two Records Using One or Multiple Labels
Section titled “Associating Two Records Using One or Multiple Labels”You can easily link two records together using one or more labels. Follow the steps below:
Steps to Associate Two Records:
Section titled “Steps to Associate Two Records:”1- Access the Records:
- Navigate to Custom Objects or Contacts, where your records are stored.
- Open the detail view of one of the records you want to associate.
2- Initiate the Association Process:
- On the right-hand panel, locate the Related Objects section.
- Click on the Association icon (often represented as a link or chain icon).

3- Select the Object to Associate:
- In the association setup window, choose the object you want to link with the current record. This can be another custom object or a contact.
4- Select the Labels:
- Choose the labels you want to associate with the two records.
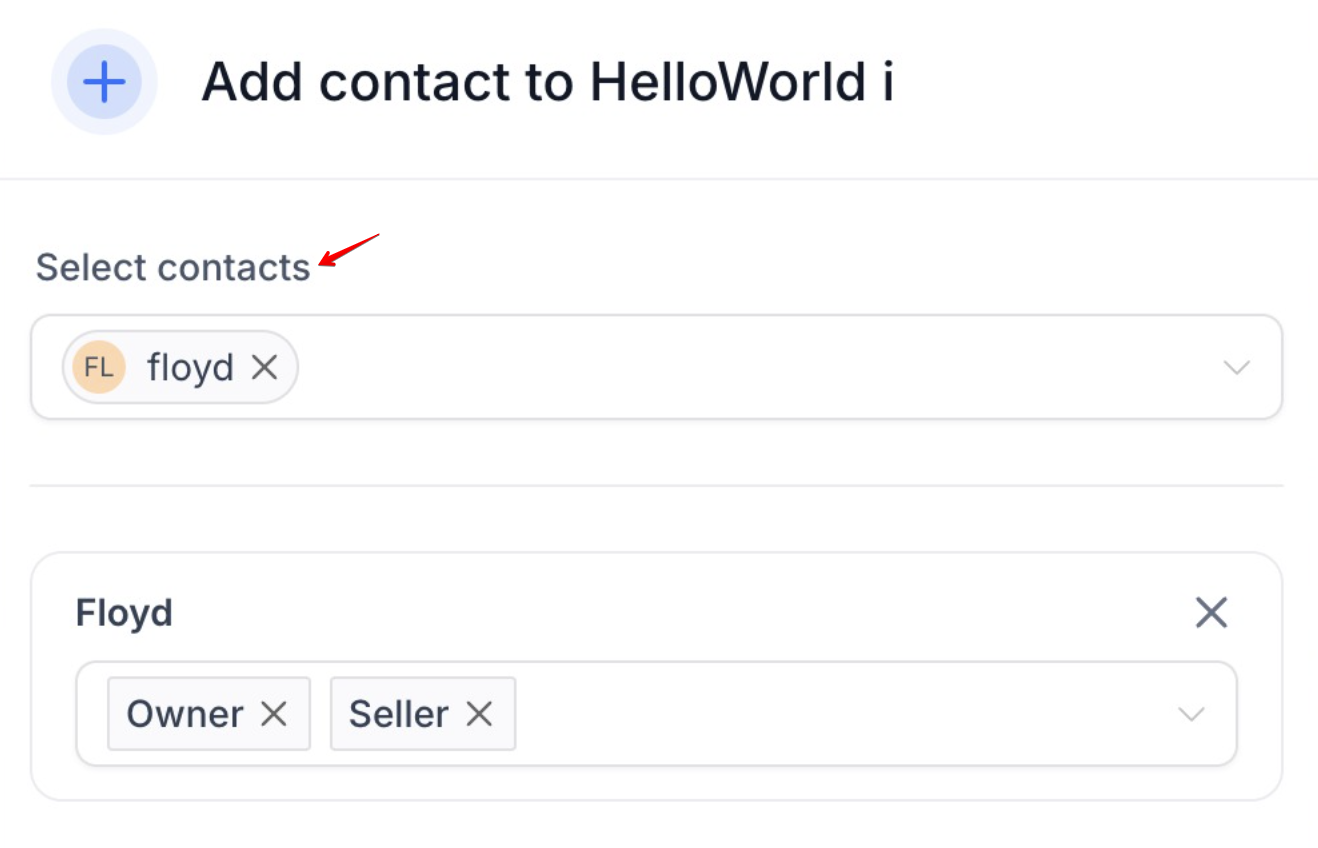
5- Save the Association:
- Click Save to confirm the association.
Finalizing the Association:
Section titled “Finalizing the Association:”- The association will appear under the Related Objects section of the record’s details.
- You can click on the associated object or contact to view the relationship and modify or delete it as needed.
- Tip: You can add associated objects as columns in the list view to easily see which records are associated with any object record.
Question: How do I create an association between two custom objects? Answer: You can create an association by selecting two records, choosing labels to define the relationship, and saving the association under the Related Objects section.
Question: Can I delete an association? Answer: Yes, you can delete an association by clicking on the kebab menu next to the association and selecting Delete. However, this action can only be performed if there are no existing relations.
Question: What is the maximum number of associations I can create for a custom object? Answer: You can create up to 10 association labels between two records or between a contact and a custom object.
Question: Can I change the label names of an existing association? Answer: You can update the label name but cannot change the internal name once the association has been created.
Question: Can I associate records using multiple labels? Answer: Yes, you can use one or more labels to associate records, depending on the relationship you want to establish.
Question: What types of relationship limits can I set for my associations? Answer: You can set various limits depending on the objects being linked. For multi-label associations, options include One-to-One, One-to-N (where N is up to 1000), One-to-Many, and Many-to-Many. For contact-to-contact associations using a single label, you can choose One-to-One, Many-to-Many, or Custom N-to-N
Question: Can I import associations in bulk via a CSV file? Answer: Yes, you can map associations during the import process. By including a unique identifier (like an Email or Record ID) for both the contact and the custom object in your spreadsheet, you can establish thousands of relationships at once instead of doing them manually.
Question: What does “Many-to-Many” mean for my custom object associations? Answer: By default, all associations are many-to-many, meaning a single contact can be linked to multiple custom object records, and a single custom object record can be linked to multiple contacts.
Question: Can I search for records based on their associations? Answer: Yes. Within the list view of your Custom Objects, you can apply filters to find records that are associated with specific contacts or other objects. You can also add “Associated Contact” as a column in your list view for quick scanning.