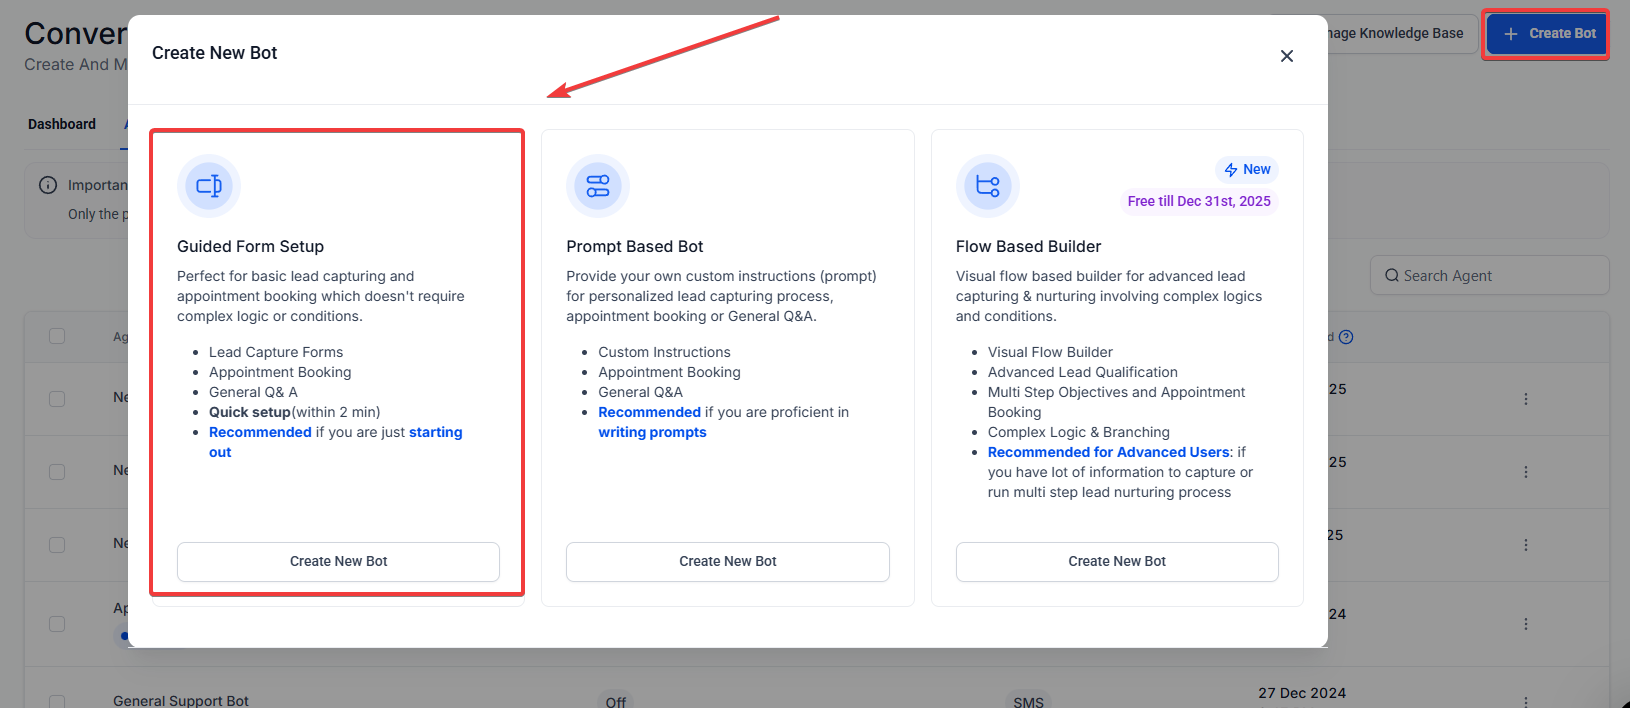
Conversation AI: Guided Form Setup
The Guided Form Bot is a powerful tool that allows you to easily create high-performing bots in Conversation AI. Whether you’re looking to capture leads, book appointments, or collect data, this feature streamlines the process by providing a structured, form-based setup. Best of all, it requires no advanced prompt-writing skills, making it ideal for users of all levels.
Key Features and BenefitsThe Guided Form Bot offers several key features that make it a valuable tool for building bots quickly and effectively:
- Quick Setup: Build bots in under 3 minutes using a simple form-based interface.
- Clear Objectives: Define clear goals like collecting a name, email, phone number, or other data points.
- Smart Skip Functionality: The bot will automatically skip questions if the information already exists, ensuring a smoother, more efficient process.
- Drag-and-Drop Functionality: Easily reorder objectives or add new questions by dragging and dropping items in the interface.
- Customizable Actions: Connect your calendar for appointment booking or trigger workflows after specific actions are completed.
How to Use the Guided Form Bot
Section titled “How to Use the Guided Form Bot”Here’s a quick, easy step-by-step guide on how to set up your own bot using the Guided Form setup:
1. Create Your Bot:
Navigate to Conversation AI > Bots and click Create Bot. You can navigate to Conversation AI either by navigating to Settings > Conversations AI, or from your account dashboard, you can navigate to AI Agents > Conversation AI.
The Guided Form Setup will appear by default. If preferred, you can switch to a more traditional prompt-based setup via the dropdown option.

2. Enter Brand Information (Optional but Recommended):
- Add your business name, industry, and preferred tone of voice to improve bot responses.
- You can skip this step for a faster setup.

3. Set Basic Bot Settings:
- Define the bot’s initial message (the first message the bot sends to users).
- Customize additional settings, such as the bot’s response time and channel selection.

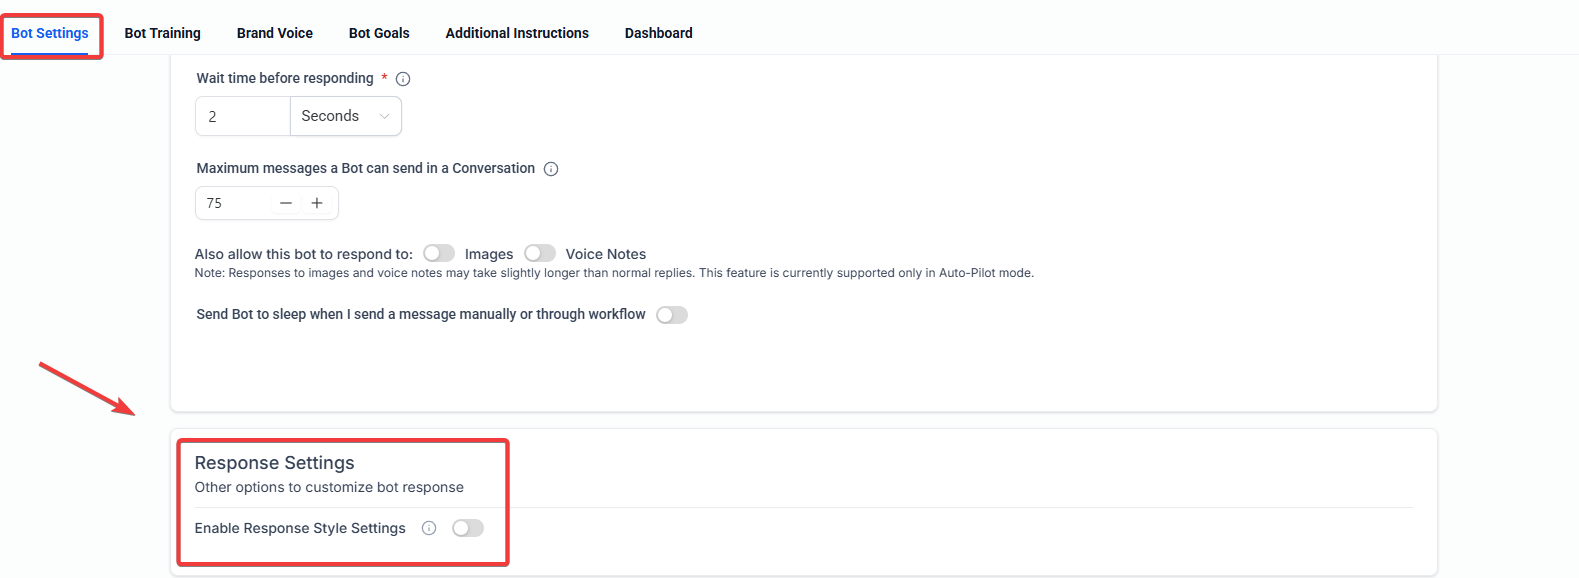
4. Response Style Settings
- You can select Concise, Balanced, or Detailed responses to match your specific business needs.
- Scroll down to Response Settings. Turn on Response Style Settings. Choose one option: Concise, Balanced, or Detailed.
5. Define Objectives and Questions:
- Add short, one-line goals like: “Collect name,” “Ask for email,” or “Request phone number.”
- The bot will follow this sequence exactly to ensure consistency in each interaction.
- Use the toggle option to automatically skip questions if the data already exists.
- Add new questions or reorder objectives easily via drag-and-drop functionality.
6. Action Setup:
- If you want your bot to book appointments, connect it to your calendar.
- Trigger specific workflows post-booking by selecting the relevant option.

7. Final Review & Custom Instructions:
- Use the “Edit Bot” function to make any final tweaks to brand info, settings, or objectives.
- For more advanced users, additional custom instructions can be added to give the bot extra context.

Pro Tips
- Pre-fill Information: To further streamline your bot’s efficiency, make sure that any data you already have about users is integrated into the bot. This will allow the bot to skip questions and provide a smoother experience.
- Test Your Bot: Before using your bot in a live environment, make sure to test its flow thoroughly. Ensure the questions follow a logical order and that the skip functionality works as expected.
- Keep It Simple: Focus on clear, concise questions for the best user experience. Avoid overly complex or lengthy prompts that may confuse the bot or the user.
- Leverage Workflow Variables: Use the “Summary” and “Transcript” variables in your automation workflows to send internal email notifications or use AI to extract specific insights from the conversation.
Question: How quickly can I set up a bot with the Guided Form Setup? Answer: You can create a fully functional bot in under 3 minutes using the Guided Form setup.
Question: Do I need to know how to write prompts? Answer: No, the Guided Form setup is designed to be simple and intuitive, requiring no prompt-writing knowledge.
Question: Can I reorder the objectives in my bot? Answer: Yes, the system allows you to easily reorder objectives using a drag-and-drop interface.
Question: What happens if I already have data for a question? Answer: The bot will automatically skip the question if it detects that the data already exists in the system, ensuring a seamless user experience.
Question: Can I make changes to the bot after it’s created? Answer: Yes, you can always return to the bot and edit objectives, settings, or add new questions at any time.
Question: If the bot books an appointment, will it stop talking to the lead?
Answer: Once all objectives are met (including the appointment booking), the bot will typically send a final confirmation message and then “stand down” unless the user initiates a new conversation with a new intent.
Question: How is a conversation summary triggered?
Answer: A summary is generated when a specific period of inactivity passes or if the bot is “put to sleep” due to a human handover, reaching a message limit, or a manual message being sent.
Question: Will the summary show the whole history of the contact?
Answer: No. Each summary reflects only the latest session and includes only the messages sent since the previous summary was generated.
Question: Can I send the conversation summary to my team via email?
Answer: Yes, you can configure the bot to automatically email summaries to admins, specific users, or even custom email addresses once the session ends.